Measurements
This is probably the most vital configuration step as is allows to define the exact list of measurements to be conducted in each cycle. Through this menu the user is able to configure set of parameters belonging to 2 broad categories:
- General non shield-specific measurements, mainly related to node status (battery, location), system optimizations, and static information.
- Shield-specific measurements, exclusively related to the connected sensors.
General Measurements
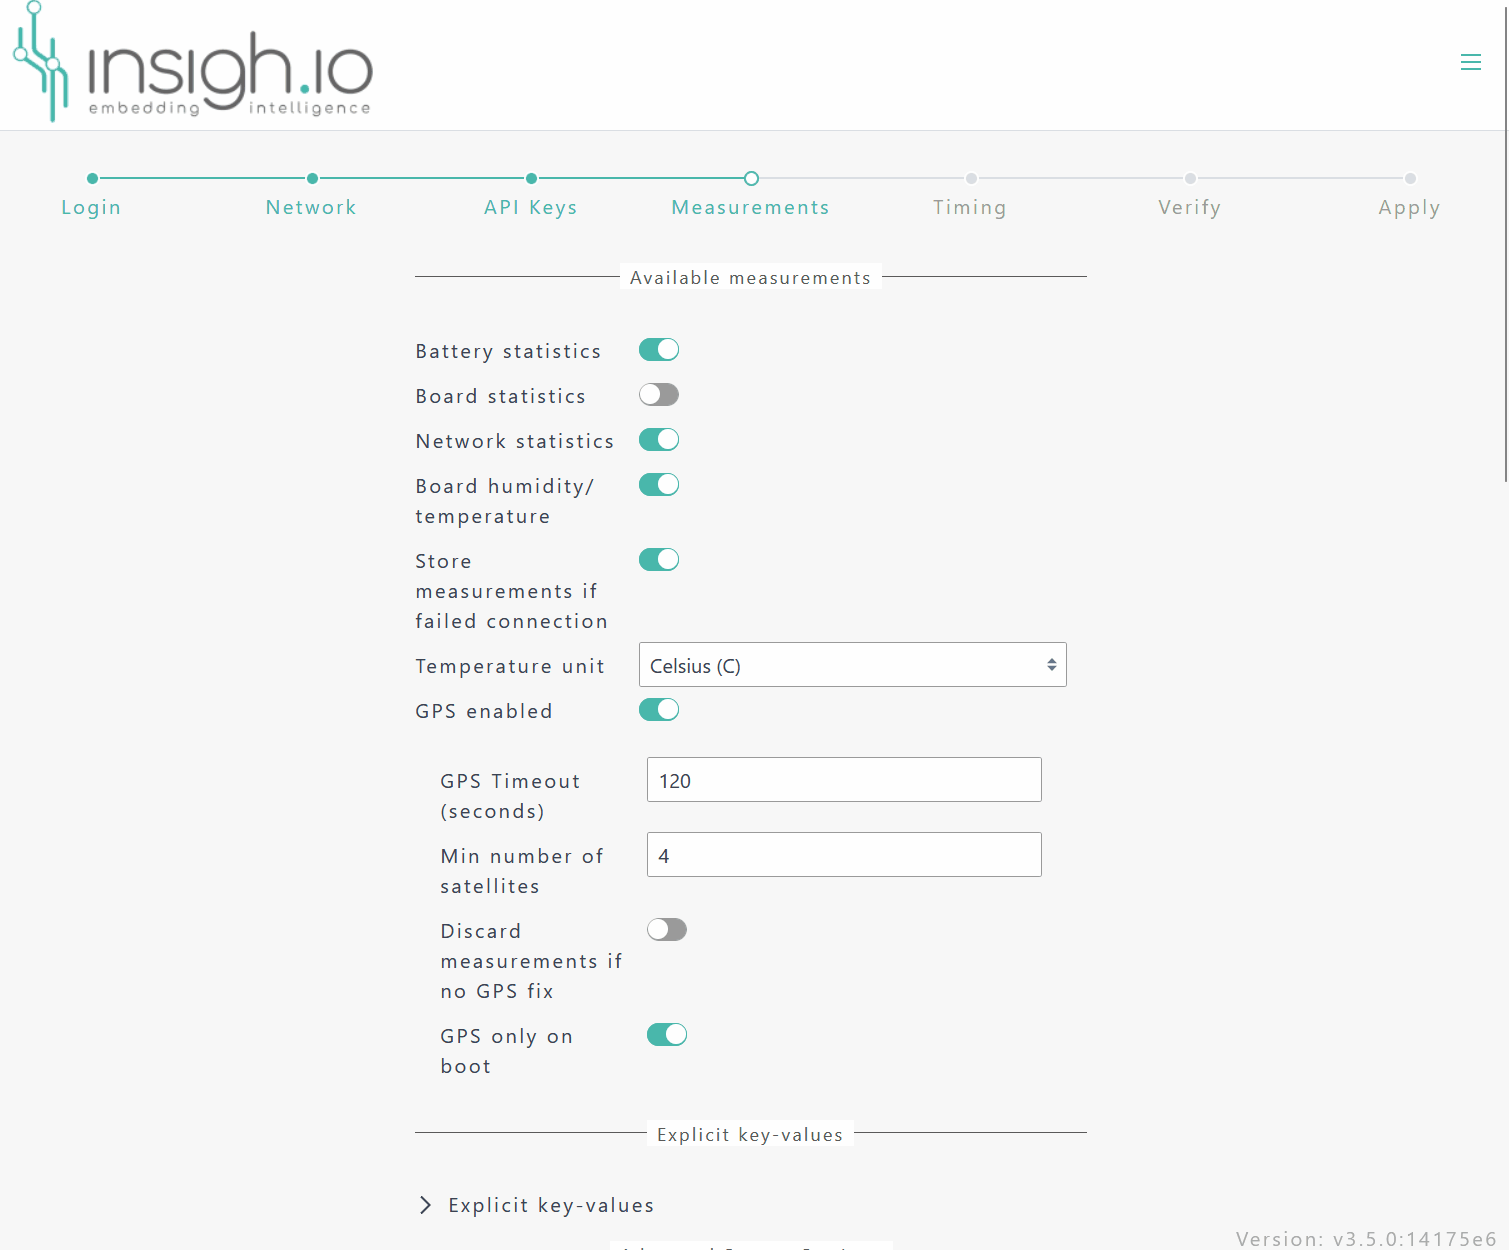
Available Measurements
This list includes generic measurements that are not tied to a specific sensor shield, but related to the main board capabilities.
| Parameter | Default Value | Comments |
|---|---|---|
Battery statistics |
Enabled | Report battery voltage. Vital for monitoring battery level. Used in Console Device Overview page to predict node lifetime. |
Board statistics |
Enabled | Report various board statistics, such as identified devices. Used mainly for debugging purposes. |
Network Statistics |
Enabled | Report network quality information, such as RSSI. Useful for detecting low signal conditions and selected Cellular technology (NB-IoT over GSM) |
Board humidity/temperature |
Enabled | Report on-board sensor (SHT40) data. Useful for identifying operation anomalies. |
Store Measurements if failed connection |
Enabled | Stores measurements locally in the node in case the network connection attempt fails |
Temperature Unit |
Celsius (C) | Celsius / Fahrenheit unit selection for reported on-board temperature |
GPS |
Enabled | Enable/Disable on-board GPS for location tracking |
GPS timeout |
120 (seconds) | Maximum time in seconds to wait for GPS fix |
Min Number of Satellites |
4 | Minimum number of tracked satellites for GPS fix |
Discard measurements if no GPS fix |
Disabled | Option to discard location measurement due to low accuracy (number of tracked satellites < min number of satellites setting) |
GPS only on boot |
Enabled | Get location from GPS only on power on, to avoid excessive battery drain. If this option is disabled, GPS fix is attempted at every data upload attempt. |
An example sample set of measurements from an insigh.io Node, assuming enabled GPS and Cellular Connectivity is provided in the following Table:
| Measurement | Unit | Explanation | Example Measurement |
|---|---|---|---|
| board_humidity | Relative humidity (%RH) | [On-board Sensor] Relative humidity | 55.89 |
| board_temp | Degrees celsius (Cel) | [On-board Sensor] Temperature | 18.01 |
| cell_act_duration | Millisecond (ms) | [Cellular Modem] Network - Activation Duration | 9300 |
| cell_att_duration | Millisecond (ms) | [Cellular Modem] Network - Attachment Duration | 259 |
| cell_ci | Text | [Cellular Modem] Network - Cell ID | 26415175 |
| cell_con_duration | Millisecond (ms) | [Cellular Modem] Network - Connection Duration | 61 |
| cell_lac | Text | [Cellular Modem] Network - Location Area Code | 8130 |
| cell_mcc | Text | [Cellular Modem] Network - Mobile Country Code | 202 |
| cell_mnc | Text | [Cellular Modem] Network - Mobile Network Code | 1 |
| cell_rsrp | Decibel Milliwatt (dBm) | [Cellular Modem] Signal Quality - RSRP | -70 |
| cell_rsrq | Decibel Milliwatt (dBm) | [Cellular Modem] Signal Quality - RSRQ | -11 |
| cell_rssi | Decibel Milliwatt (dBm) | [Cellular Modem] Signal Quality - RSSI | -57 |
| gps_dur | Millisecond (ms) | [GPS] Fix duration | 38132 |
| gps_hdop | Text | [GPS] Precision (Horizontal Dilusion) | 1.2 |
| gps_lat | Degrees latitude (lat) | [GPS] Latitude | 40.83704 |
| gps_lon | Degrees longitude (lon) | [GPS] Longitude | 21.81997 |
| gps_num_of_sat | Text | [GPS] Number of Satellites in Fix | 7 |
| reset_cause | Text | [Operation] Status Code for Reset | 4 |
| uptime | Millisecond (ms) | [Operation] Duration of current measurement cycle | 91836 |
| vbatt | Millivolt (mV) | [Operation] Battery Voltage | 4084 |
Explicit Key-Values
This optional menu allows to attach static key-value pairs to every measurement message. This information is mainly used for associating static metadata with a node, that needs to be stored along with the actual measurements.
This feature is going to be discontinued in the coming firmware versions, as metadata will be handled in a different way. Therefore, we recommend new users not to use it.
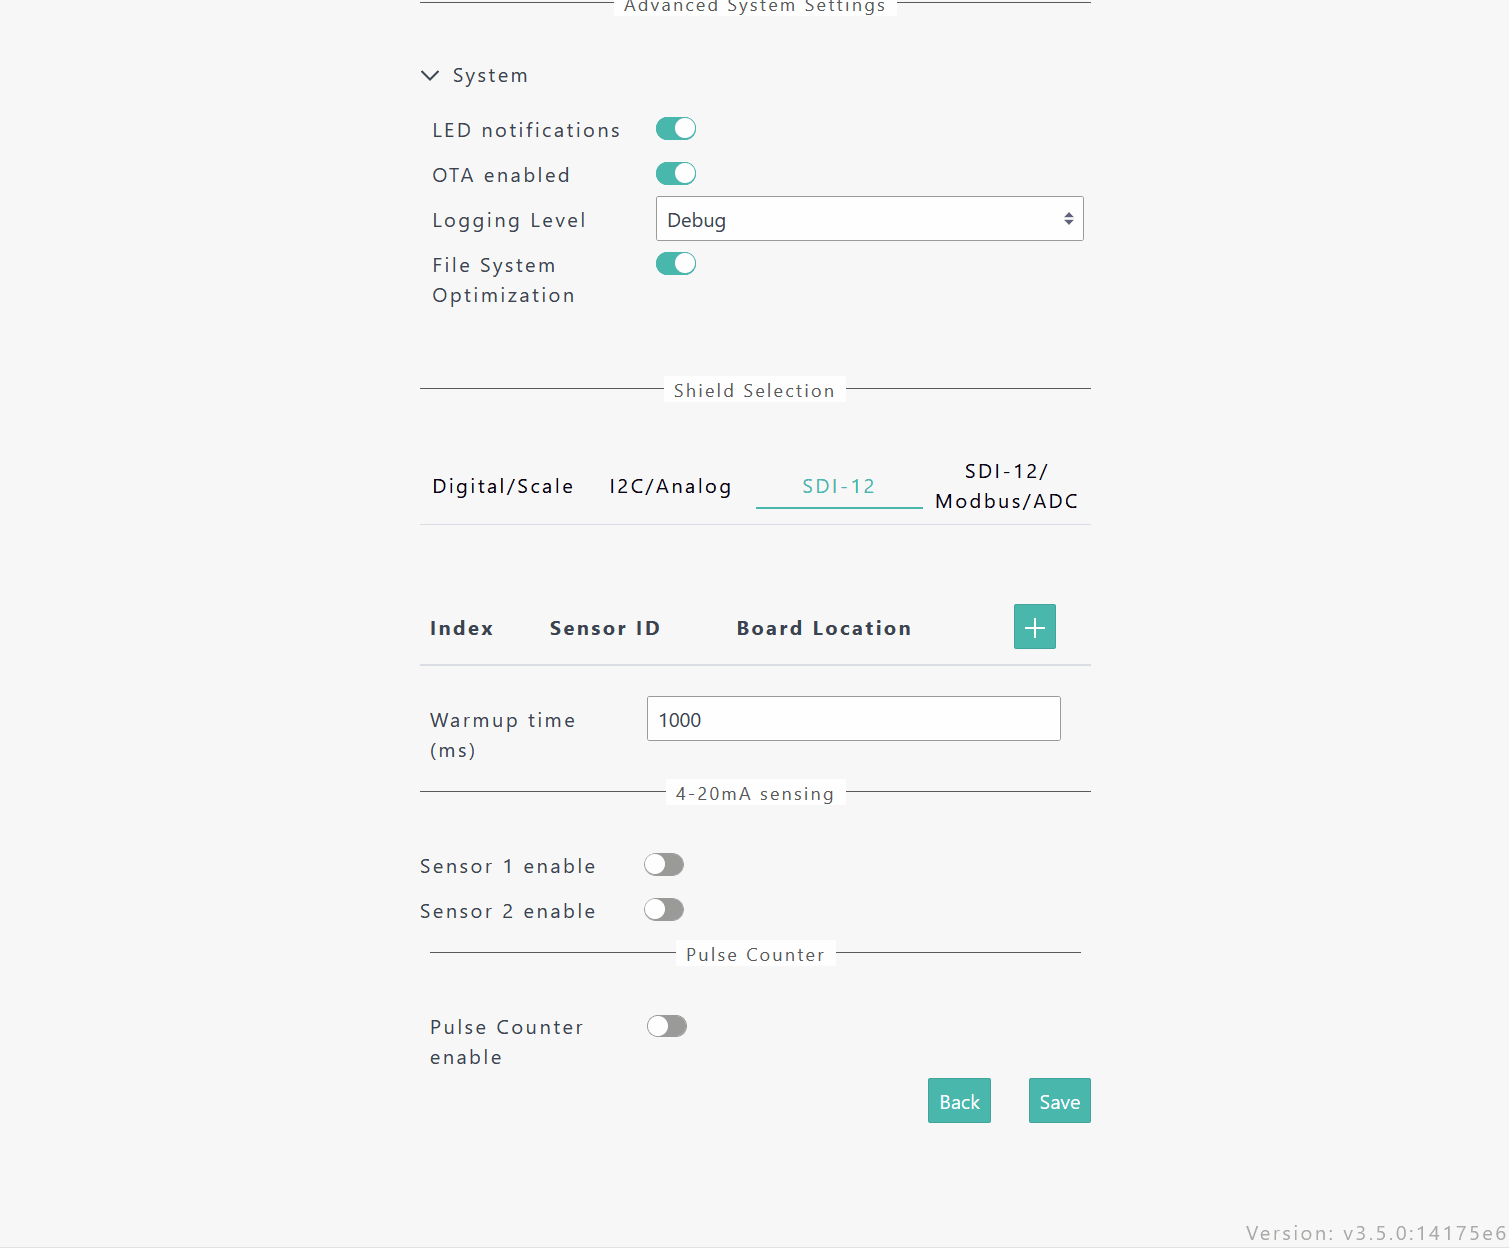
Advanced System Settings
This list includes settings that have to do with operational aspects and target mainly advanced users. If in doubt, we recommend new users to keep the default settings.
| Parameter | Default Value | Comments |
|---|---|---|
LED Notifications |
Enabled | Option for the RGB Led notifications. Color-state mappings are provided in the main board page. Deactivate it if the operational scenario is super challenging with respect to the consumed energy. |
OTA Enabled |
Disabled | Option for listening to Over-the-Air Update requests. In case this is enabled, the node will consume OTA requests from the Console at every communication attempt. |
Logging Level |
Debug | Select node debugging level from [Debug][Info][Warning][Error] list |
File System Optimization |
Enabled | If enabled, after every new configuration/OTA is applied, the system will automatically optimize the file system. This induces some delay (typically 30-45 secs) at first boot, but will save energy in all subsequent boots. Leave it enabled, unless you want to do some quick local testing. |
The following short video goes through the generic options.

Shield-specific Measurements
This menu allows to configure the sensor ports specified in the corresponding hardware page.
- 1 x I2C
- 3 x generic analogue/digital
Notice: In older firmware versions, the Base shield is reported as I2C/Analog.
| Parameter | Options | Comments |
|---|---|---|
I2C #1 |
Select from a supported list of common I2C sensors | This list contains a list of sensors that are supported out-of-the-box. For an unsupported sensor the firmware should be extended. |
Analogue/Digital P1/P2/P3 |
[DHT11][DHT22][DS18x20][Generic Analogue] | Select from a supported list of common Analogue/Digital (1-wire) sensors or select “generic” to get the raw voltage reading from an analogue sensor. Set all available ports if needed. |
P1/P2/P3 Transformation |
Optional | Define a transformation formula of raw voltage reading to a more meaningful metric, using standard python expressions (e.g. convert voltage readings to electrical conductivity for soil moisture sensors). |
The following short video presents the interface for configuring the BASE shield.
This menu allows to configure the sensor ports specified in the corresponding hardware page.
- 2 x SDI-12
- 2 x 4-20mA
- 1 x Pulse Counter
Notice: In older firmware versions, the Advanced shield is reported as SDI-12.
| Parameter | Options | Comments |
|---|---|---|
SDI-12 n.X |
Sensor Address/Board Location | Add as many sensors as needed, where for each sensor enter the Address (0-9) and the Physical Location (1 or 2) of it in the Board |
Warmup Time (SDI-12) |
Waiting time (in ms) after activating the sensor supply | Consult the sensor specifications to select the proper warmup time. In case the sensor is continuously powered, this setting is irrelevant. |
4-20mA Sensor Enable |
Enable/Disable | Activate the specific physical port measurement |
4-20mA Sensor Formula |
Formula | Optional transformation formula of raw current reading to a more meaningful metric using standard python expressions (e.g. convert mA to pressure values for current-sense based pressure sensors). |
Pulse Counter Enable |
Enable/Disable | Activate the specific physical port measurement |
Pulse Counter High Frequency |
Enable/Disable | Configure pulse counter for optimally measuring high frequency signals |
Pulse Counter Formula |
Formula | Optional transformation formula of a raw pulse reading to a more meaningful metric using standard python expression (e.g. convert pulses to actual water consumption for water meters). |
The following short video presents the interface for configuring the ADVANCED shield.
This menu allows to configure the sensor ports specified in the corresponding hardware page.
- 1 x SDI-12
- 1 x Modbus RTU
- 4 x Analogue/4-20mA
- 2 x Pulse Counter
Notice: In older firmware versions, the Enviro shield is reported as SDI-12/Modbus/ADC.
| Parameter | Options | Comments |
|---|---|---|
Warmup Time |
Waiting time (in ms) after activating the sensors supply | Consult the sensor specifications to select the proper warmup time. In case the sensor is continuously powered, this setting is irrelevant. |
SDI-12 n.X |
Sensor Address/Command/Subcommand | Add as many (virtual) sensors as needed, where for each, sensor enter the Address (0-9), the SDI-12 Command (M/C/R/V/X) and -if needed- the SDI-12 SubCommand (e.g. M0, M1) |
Modbus Baud Rate |
[4800][9600][19200][38400][57600][115200] | Consult the Modbus sensor datasheet for setting the baud rate |
Modbus Data Bits |
[7/8] | Consult the Modbus sensor datasheet for setting the Data Bits |
Modbus Stop Bits |
[1/2] | Consult the Modbus sensor datasheet for setting the Stop Bits |
Modbus Register |
Slave Addr/Register/Type/Format/Factor/Decimal Digits/MSW First/Little Endian | Add as many register read commands as needed. Consult the Modbus sensor datasheet for setting the proper parameters |
Analogue Sensor 1/2/3/4 Enable |
Enable/Disable | Activate the specific physical port measurement |
Analogue Sensor 1/2/3/4 Gain |
1x/2x/4x/8x/16x | ADC Gain depending on expected voltage level (0:3.3V, 0:2.048V, 0:1.024V, 0:0.512V, 0:0.256V) |
Analogue Sensor 1/2/3/4 Formula |
Formula | Optional transformation formula of raw voltage readings to a more meaningful metric |
Pulse Counter 1/2 Enable |
Enable/Disable | Activate the specific physical port measurement |
Pulse Counter 1/2 High Frequency |
Enable/Disable | Configure pulse counter for optimally measuring high frequency signals |
Pulse Counter Formula |
Formula | Optional transformation formula of raw pulse reading to a more meaningful metric |
Notice: The analogue sensor ports always return the detected voltage levels (mV). In case the 4-20mA option is selected in hardware (by placing the jumpers), the user should enter the formula v/100 to get the current sense reading (mA) explicitly.
The following short video presents the interface for configuring the ADVANCED shield.

Custom Measurement Naming
After setting the shield measurements and hitting “Save”, a new Dialogue called “Custom Measurement Naming” appears. The dialogue can be skipped with hitting “Save”. Otherwise if “Fetch” is selected, the user can:
- Verify the sensor setup by executing a test run which returns the list of active measurements with their current values.
- Assign aliases to default measurement names for having meaningful/self-explanatory measurement reporting.
The following short video presents how to live fetch data from the node and assign alternative names (“aliases”) to metrics.